They are all part of one conversation of and under the same “subject”. What they do not share, alas, in Windows Live Mail is a common location and order — so you can read them in easy, successive order; not yet!
It’s easy, fortunately, to have Windows Live Mail group mail by subject.
View Mail Grouped by Conversation Thread in Windows Live Mail
To have Windows Live Mail arrange messages by conversation, grouping messages with matching subjects so you can read them in order:
* Select View | View by conversation from Windows Live Mail’s menu viewing a folder.
o If you cannot see the menu bar, hold down the Alt key.
To expand a conversation, click the right-pointing triangle in front of the oldest message in the thread.
Note that Windows Live Mail will not include messages from other folders in the conversation view. To see received and sent messages in a thread, for example, move both to a single folder.
Leave a comment | posted in Conversation view, Email client support, Email Support, Known Issues in Windows live mail, Technical support, TechSupp247, Windows Live, Windows live mail, Windows live mail feature
Welcome to WordPress.com. This is your first post. Edit or delete it and start blogging!
1 Comment | posted in Uncategorized
Conversation view in Outlook 2010 makes it easy for you to follow a discussion thread. By switching to Conversation View, Outlook 2010 combines all the messages within the thread into one package.
Conversation View is enabled by default in Outlook 2010. If you’re one of those people who don’t find Conversation View to be of any value, you can easy turn it off.
To turn off Conversation View for the current folder:
1. Open the appropriate Outlook folder.
2. Right click any of the field names.
3. Click Arrange By and then select conversations now select Show Messages in Conversations so that the Show Message in Conversations is no longer checked.
To apply this change to all Outlook folders:
1. Select the View tab on the Ribbon.
2. Click Change View.
3. Click Apply Current View to other mail Folders.
4. Select your entire mailbox and click OK.
Leave a comment | posted in Disable conversation, Email client support, Email Support, How to's in Microsoft outlook 2010, Microsoft office, Microsoft Outlook, Microsoft Outlook 2010, Technical support, TechSupp247
In Office 2010 the location of some of the previously inherited options are different. If you are familiar with Outlook 2007 and have recently migrated to the Office 2010 then you might be wondering about from where you can add signatures to your emails. Here are the steps to add signatures in Outlook 2010.
First lick the “File”, and the go to options. The Outlook Options dialogue box will be displayed.
Now click the Mail option located in the left side menu, and locate the create and modify signatures for message option in the right side main window.
Now click the Signatures button located in front of the create and modify signatures for message option. The Signatures and Stationary dialogue box will be displayed, now in order to add new signatures, click the New button.
Here add your signature’s text under the Edit signature text area and click the OK button.
Now your personal signature will appear at the end of every email you send.
Leave a comment | posted in Adding Signature, Email client support, Email Support, How to's in Microsoft outlook 2010, Microsoft office, Microsoft Outlook, Microsoft Outlook 2010, Technical support, TechSupp247
What does the blue arrow icon pointing left and right on a folder mean? Is there something you need to worry about it? What is this icon all about?
This blue double-ended or 2-way arrow icon means that the folder is part of a shared source you are connected to and thus not part of your own mailbox. A shared source could be a mailbox belonging to someone else, a Public Folder, an Internet Calendar or a SharePoint library.
This overlay icon has been introduced in Outlook 2007 and is also used in Outlook 2010. It’s only a visual aid and doesn’t for instance indicate whether or not the folder is cached. Whether or not a shared folder can be cached depends on the type of shared folder and your version of Outlook.
Note that the blue arrow icon isn’t shown on default mail folders which already hold an overlay icon of their own such as the Inbox, Sent Items and Junk E-mail folder.This display shown is from Outlook 2010 installed in Windows 7 and it is same if you have outlook 2010 installed in Windows XP.
Leave a comment | posted in Bule arrow on folders, Email client support, Email Support, How to's in Microsoft outlook 2010, Known Issues in Outlook, Microsoft office, Microsoft Outlook, Technical support, TechSupp247
When you begin using Outlook 2010 the first thing that oyu noticed was the dramatic change of the File menu compared to 2007 and previous versions of Office. Microsoft has done a great job of condensing the menu and making it easier to navigate, however for those of us who are used to the location of items on the menus it can be a little time consuming to locate what you need.
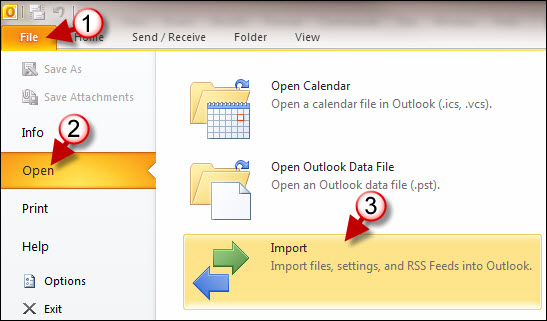
This was the case with the Import/Export Wizard that is normally found in the File menu (see screenshot below). The item is now tucked away in the Save options in the File menu. The how-to below will walk you through the steps necessary to import contacts from a .CSV file to Outlook 2010′s contact list.
Importing the CSV File
1. Click on File to open the menu.
2. Click on Open which will expand the Open submenu.
3. Click on Import to open the Import and Export Wizard
4. Select the action you wish to perform. In this case we are importing a file from another program. Click on Import from another program or file.
5. Click Next to proceed.
6.Choose the file type to import from, in this case we are importing from a CSV (Comma Separated Value) file.
7. Click Next to proceed.
8. Click on Browse to locate the file you wish to import from.
9. Locate and select the file you wish to import from.
10. Click OK to select the file and proceed.
11. You are presented with 3 options when importing contacts;
* Replace duplicates with items imported
* Allow duplicates to be created
* Do not import duplicate items
Choose the option that best fits your needs.
12. Click Next to proceed.
13. Click on Contacts to specify it as the destination of the items being imported.
Note: If you have multiple Outlook files this step in the wizard will allow you to specify a different folder other than the default.
14. Click Next to proceed.
15. Verify that everything is correct then click Finish to start the import process.
Once the import process is finished you should see the items that were imported in your Outlook contact list.
Leave a comment | posted in Email client support, Email Support, How to's in Microsoft outlook 2010, importing contacts, Microsoft office, Microsoft Outlook, Technical support, TechSupp247
once in a while Outlook’s data files used to store all your emails, contacts and calendar entries gets corrupted. If you have an Gmail, Yahoo Mail or Hotmail which backs up all your email then you can very easily restore Outlook to default settings. Here is how you can reset Outlook 2003, 2007 or 2010 to factory default settings.
In Windows XP go to “Start” then select the “Control Panel” and then switch to “Classic View” option in left hand column. Then select “Mail”
In Windows7 go to “Start” then select the “Control Panel” and look for “Mail”. If you cannot find it type “mail” in the search box on the top right. Then click “Mail”.
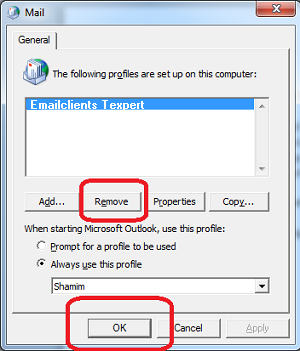
This will bring up the Mail Setup dialog box with Show Profiles section that we are interested in.
In most cases you will just have one mail profile. If you delete this profile then all your Outlook settings will be reset to default. To delete click Remove and then press OK.
Leave a comment | posted in Email client support, Email Support, How to's in Microsoft outlook 2010, Microsoft office, Microsoft Outlook, reset to default, Technical support, TechSupp247
If you find you’re sending emails to the same people all the time during the day in Outlook, it’s tedious entering in their addresses individually. Today we take a look at creating Contact Groups to make the process a lot easier.
Create Contact Groups
Open Outlook and click on New Items then select More Items now click on Contact Group.
This opens the Contract Group window. Give your group a name, click on Add Members, and select the people you want to add from your Outlook Contacts, Address Book, or Create new ones.
If you select from your address book you can scroll through and add the contacts you want. If you have a large amount of contacts you might want to search for them or use Advanced Find.
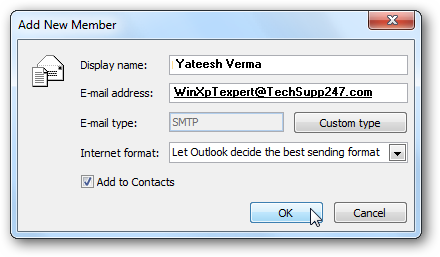
If you want to add a new email contact to your group, you’ll just need to enter in their display name and email address then click OK. If you want the new member added to your Contacts list then make sure Add to Contacts is checked.
After you have the contacts you want in the group, click Save & Close.
Now when you compose a message you should be able to type in the name of the Contact Group you created.
If you want to make sure you have everyone included in the group, click on the plus icon to expand the contacts. You will get a dialog box telling you the members of the group will be shown and you cannot collapse it again. Check the box not to see the message again then click OK.
Then the members of the group will appear in the To field. Of course you can enter a Contact Group into the CC or Bcc fields as well.
Leave a comment | posted in Email client support, Email Support, How to's in Microsoft outlook 2010, Microsoft office, Microsoft Outlook, Technical support, TechSupp247